Battery switch on travel trailer function is crucial for managing your RV’s power. Understanding how it works is key to avoiding dead batteries and electrical problems. This guide breaks down everything you need to know, from different switch types to troubleshooting tips and essential safety precautions. We’ll cover installation, maintenance, and how to maximize your battery life using your switch effectively.
We’ll explore the various types of battery switches available – single, dual, and more – and examine their wiring diagrams. We’ll delve into common issues like blown fuses and no power, providing step-by-step troubleshooting solutions. Plus, learn how to safely connect and disconnect external power sources and practice safe battery handling.
Understanding Battery Switch Functionality in Travel Trailers
A battery switch is a crucial component in any travel trailer’s electrical system, allowing you to control the flow of power from your house batteries to the trailer’s appliances and systems. Understanding how it works and how to install it properly is essential for safe and reliable operation.
Battery Switch Purposes
The primary purpose of a battery switch is to isolate the house batteries from the trailer’s electrical system. This is vital for several reasons: preventing battery drain when the trailer is stored, protecting against accidental short circuits, and enabling the connection of a charging source without affecting the house battery load. It essentially acts as a master on/off switch for your trailer’s 12V system.
Types of Battery Switches
Travel trailers utilize various battery switch types, each with its own advantages and disadvantages. The most common are single battery switches, dual battery switches, and those with additional features like a disconnect switch. A single switch simply connects or disconnects a single battery bank to the trailer’s system. A dual battery switch allows you to switch between two battery banks (common in trailers with two batteries for increased capacity), or to disconnect both banks simultaneously.
Some switches incorporate an additional disconnect feature, providing an extra layer of safety.
Battery Switch Wiring Diagram
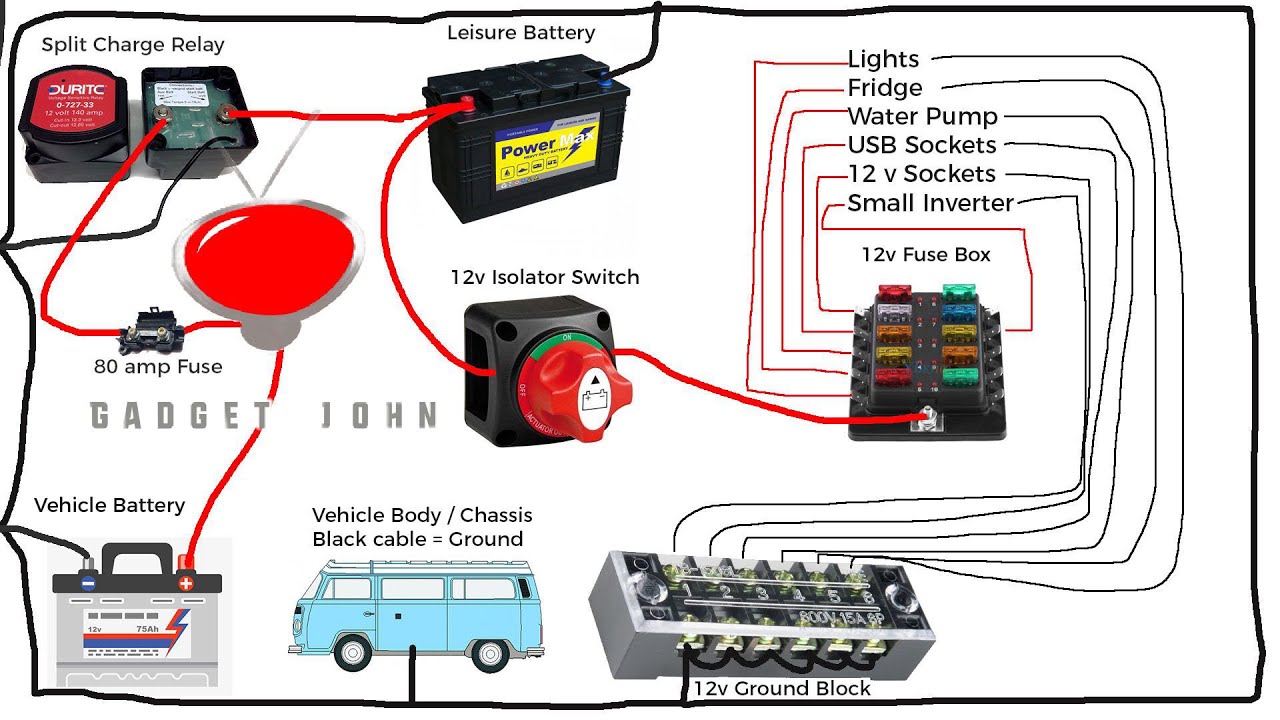
A typical dual battery switch setup involves two batteries, the battery switch itself, and the trailer’s 12V electrical system. The positive (+) cables from each battery connect to the switch’s input terminals. The output terminal of the switch then connects to the positive bus bar that feeds power to the trailer’s appliances and systems. Negative (-) cables from each battery typically connect directly to the trailer’s chassis (ground), although some setups may include a negative bus bar as well.
The exact wiring configuration will depend on the specific battery switch and trailer’s electrical system. Remember, always consult your trailer’s wiring diagram and the instructions provided with your battery switch. Incorrect wiring can lead to dangerous situations.
Installing a Battery Switch
Installing a battery switch requires basic electrical knowledge and the right tools. Always disconnect the negative battery cable before working on any electrical system.
- Choose a location: Select a readily accessible location, ideally close to the batteries but protected from the elements.
- Mount the switch: Securely mount the switch to a stable surface using appropriate hardware.
- Connect the positive cables: Connect the positive cables from each battery to the corresponding input terminals on the switch, ensuring secure connections with appropriate-sized ring terminals and lugs.
- Connect the output cable: Connect the output cable from the switch to the positive bus bar of the trailer’s electrical system.
- Connect the negative cables: Connect the negative cables from each battery to the trailer’s chassis or negative bus bar.
- Test the installation: After completing the wiring, carefully test the switch to ensure it operates correctly and that power is flowing to the trailer’s systems when the switch is in the “on” position.
- Reconnect the negative battery cable: Once everything is functioning properly, reconnect the negative battery cables.
Comparison of Battery Switch Types
| Type | Features | Benefits | Drawbacks |
|---|---|---|---|
| Single Battery Switch | On/Off control for a single battery bank. | Simple, inexpensive, easy to install. | Limited functionality; only suitable for trailers with one battery. |
| Dual Battery Switch | On/Off control for two battery banks, typically with a combined off position. Often includes a battery selector switch. | Allows switching between battery banks or disconnecting both. Provides longer run times and increased capacity. | More complex installation than a single switch; slightly higher cost. |
| Dual Battery Switch with Disconnect | Combines the functionality of a dual battery switch with a master disconnect switch for complete isolation of the battery system. | Provides maximum safety and protection against accidental short circuits or battery drain. | Most expensive option; more complex installation. |
Troubleshooting Common Battery Switch Issues
Your travel trailer’s battery switch is a crucial component, controlling power flow to your house batteries. Problems with this switch can leave you stranded without lights, appliances, or even the ability to start your tow vehicle. Understanding common issues and how to troubleshoot them is essential for any RV owner.
Common Battery Switch Problems and Troubleshooting Steps
A non-functioning battery switch manifests in several ways. The most obvious is a complete lack of power to your trailer’s 12-volt system, even when the batteries are charged. Another common issue is blown fuses, which can indicate a short circuit somewhere in the system. Before diving into more complex diagnoses, always check your fuses first. If a fuse is blown, replace it with a fuse of the same amperage rating.
If the new fuse blows immediately, you have a short circuit that needs attention – don’t ignore this. If the fuse doesn’t blow, the problem likely lies elsewhere in the system. If replacing the fuse doesn’t solve the problem, inspect the wiring for any visible damage, loose connections, or corrosion. Clean and tighten any loose connections and repair or replace damaged wiring.
If the problem persists, the switch itself might be faulty.
Diagnosing a Faulty Battery Switch
To diagnose a potentially faulty switch, you’ll need a multimeter. First, ensure your batteries are adequately charged. With the switch in the “off” position, use the multimeter to check the voltage across the battery terminals. You should read a voltage close to the battery’s rated voltage (typically 12V). Next, switch the switch to the “on” position.
Measure the voltage again at the output terminals of the switch. If the voltage is significantly lower or zero, the switch is likely the culprit. A visual inspection can also reveal obvious signs of damage, such as corrosion, loose connections, or burnt components. A clicking sound when you try to switch it on might also indicate a problem within the switch itself.
Replacing a Faulty Battery Switch
Replacing a battery switch is generally a straightforward process, though the exact steps may vary depending on the switch’s make and model. Begin by disconnecting the battery cables from both the battery and the switch. This is crucial for safety. Then, carefully remove the switch from its mounting location. This often involves unscrewing it or releasing retaining clips.
Before installing the new switch, double-check that you have the correct replacement. Wire the new switch according to the manufacturer’s instructions, ensuring that all connections are secure and properly insulated. Reconnect the battery cables and test the switch to confirm that it’s working correctly.
Causes of a Dead Battery Despite a Functioning Switch, Battery switch on travel trailer function
Even with a functioning battery switch, your batteries can still go dead. Several factors can contribute to this.
- Parasitic Drains: Small electrical loads, like interior lights or clocks, can drain the battery over time if not properly switched off. Leaving a light on or a device plugged in can quickly deplete the battery.
- Alternator Issues: If your tow vehicle’s alternator isn’t charging the batteries adequately, they will eventually drain. Have your alternator checked if you suspect this.
- Bad Battery Cells: A single failing cell within a battery can render the entire battery unusable. Have your batteries tested for individual cell voltage.
- Corrosion: Corrosion on battery terminals or connections can impede current flow, preventing proper charging. Clean the terminals regularly.
- High Current Draw: A device drawing significantly more current than the battery can supply will drain the battery quickly. Check for any malfunctioning appliances.
Battery Switch and Power Management
Your travel trailer’s battery switch is more than just an on/off button; it’s a crucial component in managing your power resources and ensuring a smooth, enjoyable camping experience. Understanding its role in battery maintenance and power consumption is key to maximizing your battery life and avoiding frustrating power outages.Proper battery maintenance significantly impacts the lifespan and performance of your batteries, directly affecting your ability to use your trailer’s appliances.
The battery switch plays a vital role in this process.
Battery Switch’s Role in Power Management
The battery switch acts as a central control point, allowing you to isolate and manage the flow of power between your trailer’s batteries, external power sources (like shore power), and your appliances. This control is essential for preventing accidental drain on your batteries when not in use and for efficiently managing power consumption. By strategically using the switch, you can direct power from the source best suited for your needs at any given moment.
For instance, when connected to shore power, the switch allows you to charge your batteries while simultaneously powering your trailer’s systems.
Conserving Battery Power Using the Battery Switch
The most effective way to conserve battery power is by understanding the different positions of your battery switch. Most switches offer positions for “off,” “battery,” “shore power,” and sometimes a combined “both” setting. When parked without shore power, the “battery” setting allows you to use your house batteries. Switching to “off” completely disconnects the batteries from the trailer’s electrical system, preventing drain even when the trailer is unused for extended periods.
Using the “shore power” setting when connected to an external power source ensures your appliances run directly from the external power and your batteries are charged. The “both” setting, if available, allows you to draw power from both sources simultaneously. Understanding these settings and utilizing them appropriately will dramatically increase the lifespan and performance of your batteries.
Crucial Situations Requiring Battery Switch Use
Several situations highlight the importance of a properly functioning battery switch. For example, if you experience a problem with your shore power connection, switching to the “battery” setting ensures a seamless transition to battery power, preventing sudden power loss. Conversely, switching to “off” while you are away from your trailer, or even overnight, will prevent your batteries from being drained by a faulty appliance or a parasitic draw (a small, continuous drain caused by a component that remains powered even when it’s turned off).
Before working on any electrical components in your trailer, switching to the “off” position is a crucial safety precaution.
Connecting and Disconnecting External Power Sources
Connecting and disconnecting external power sources is straightforward. Ensure the battery switch is in the “off” position. Connect your shore power cable to your trailer and then to the power source. Once connected, switch to the “shore power” position to allow power to flow to your trailer. Disconnecting is equally simple: switch the battery switch to the “off” position, then disconnect the shore power cable.
This sequence ensures safety and prevents accidental shorts or damage to your electrical system. Remember to always disconnect the shore power cable
before* switching to the “off” position if you have the “both” setting and it’s currently engaged.
Safety Considerations Related to Battery Switches
Working with RV batteries and their switching systems requires caution. Improper handling can lead to serious injury from electric shock, burns, or explosions due to the release of flammable gases. Understanding and following safety procedures is paramount to preventing accidents.
Battery switches, while seemingly simple devices, are crucial components in your travel trailer’s electrical system. Their proper use and maintenance directly impact the safety and longevity of your batteries and other electrical components. Neglecting safety precautions can lead to damage to your equipment, and potentially hazardous situations. Always prioritize safety when working with your RV’s electrical system.
Potential Hazards of Incorrect Battery Switch Usage
Incorrect usage of the battery switch can lead to several hazards. For example, accidentally connecting the house batteries to the chassis batteries while the engine is running could lead to a significant voltage surge, potentially damaging sensitive electronic components in your RV. Similarly, failing to disconnect the batteries before performing maintenance can result in electric shock. A poorly maintained or improperly installed switch could overheat, potentially causing a fire.
Gas buildup from overcharging or damaged batteries presents another serious risk of explosion.
So, you’re an audiophile who travels? Awesome! Check out this guide on audiophile travel setups for tips on keeping your sound quality high on the go. It’s all about packing smart, prioritizing what matters most in your sound, and finding portable solutions. Then, once you’ve got your travel kit sorted, head over to audiophile travel setups for some extra ideas on integrating your passion for music into your adventures.
Remember, a great soundtrack makes any trip better!
Safe Operation and Maintenance Best Practices
Safe operation involves understanding your specific battery switch’s functionality and limitations. Before working on the switch or batteries, always disconnect the negative (-) terminal first. This helps prevent accidental short circuits. Regularly inspect the switch for corrosion, loose connections, or signs of overheating. Keep the switch and surrounding area clean and dry to prevent corrosion and potential electrical hazards.
Consider using a battery disconnect switch that has a visible “on” and “off” indicator to avoid confusion. Replace any damaged or corroded components immediately.
Ensuring Proper Grounding and Connections
Proper grounding is critical for both safety and performance. Ensure that the battery switch is securely grounded to the RV’s chassis using a heavy-gauge wire of sufficient length. This helps to prevent voltage spikes and ensures a safe return path for the electrical current. All connections to the battery switch should be tight and free of corrosion.
Use appropriate-sized terminals and connectors for the wire gauges to avoid overheating and potential fire hazards. Check connections regularly for tightness and corrosion.
Using Appropriate Safety Equipment
Always wear appropriate safety equipment when working with batteries and switches. This includes safety glasses to protect your eyes from sparks or battery acid splashes, insulated gloves to prevent electric shock, and closed-toe shoes to protect your feet. If working in a poorly ventilated area, consider using a respirator to avoid inhaling potentially harmful gases. It’s also advisable to have a fire extinguisher nearby, specifically one rated for electrical fires.
So, you’re an audiophile who travels? Awesome! Check out this guide on building the perfect audiophile travel setup for amazing sound on the go. It’s all about finding the right balance of portability and quality. Then, for some extra tips and gear reviews, head over to audiophile travel aetup – they’ve got some great resources for planning your next sonic adventure.
Remember, good sound doesn’t have to stay home!
Safety Precautions When Working with the Battery Switch
A checklist of safety precautions is essential before starting any work. This helps ensure a safe and efficient process.
- Always disconnect the negative (-) battery terminal first before working on the switch or batteries.
- Inspect the switch and connections for corrosion or damage before each use.
- Wear appropriate safety equipment, including safety glasses, insulated gloves, and closed-toe shoes.
- Ensure adequate ventilation when working with batteries to avoid inhaling harmful gases.
- Keep a fire extinguisher rated for electrical fires nearby.
- Never work on the electrical system while it is energized.
- Consult a qualified technician if you are unsure about any aspect of the battery switch operation or maintenance.
Battery Switch and Different Trailer Setups: Battery Switch On Travel Trailer Function
Choosing the right battery switch for your travel trailer depends heavily on the size and complexity of your setup. Small campers have different needs than large RVs, and understanding these differences is key to ensuring reliable power and avoiding potential problems.Different trailer setups require varying levels of power management. A small camper might only need a single battery and a simple switch, while a large RV might incorporate multiple batteries, an inverter, and a more sophisticated switching system.
This impacts not only the type of switch but also the wiring and safety precautions needed.
Battery Switch Setups in Various Travel Trailers
Small travel trailers, pop-ups, and teardrops often use a simple single-battery setup with a basic switch. This switch allows the user to select between using the trailer’s house battery, the tow vehicle’s battery, or both. Larger RVs, on the other hand, frequently incorporate multiple batteries (often two or more deep-cycle batteries) and may use a more advanced switch, such as a battery combiner or a more complex multi-position switch to manage charging and power distribution efficiently.
Some larger setups may even include a dedicated starting battery separate from the house batteries.
Impact of Trailer Size and Power Requirements on Battery Switch Choice
The size and power requirements of your travel trailer directly influence the battery switch selection. A small camper with minimal power needs might only require a simple on/off switch or a two-position switch for selecting between battery sources. Larger RVs, however, with significant power demands from appliances like air conditioners, microwaves, and entertainment systems, necessitate a more robust system capable of handling higher amperage and possibly incorporating features like battery combiners or intelligent charging systems.
For example, a small camper might use a 100-amp switch, whereas a large RV could require a 200-amp or even higher capacity switch.
Battery Switch and Different Battery Types
Using a battery switch with different battery types requires careful consideration. Lead-acid batteries, the most common type in travel trailers, generally work well with standard battery switches. However, lithium batteries, while offering advantages in terms of weight, lifespan, and performance, often require specific charging profiles and may not be compatible with all battery switches. Some switches are explicitly designed for lithium batteries, while others might damage them if used incorrectly.
It’s crucial to check the switch’s specifications to ensure compatibility with your chosen battery type. Incorrect use can lead to overcharging, undercharging, or even battery failure.
Diagram of a Typical Battery Switch Setup in a Small Travel Trailer
A simple diagram shows a single 12V deep-cycle battery connected to a two-position battery switch. One position connects the battery directly to the trailer’s 12V system, while the other connects it to the tow vehicle’s charging system. A fuse is placed in-line to protect the wiring from overcurrent. The trailer’s 12V appliances are connected to the output side of the switch.
The diagram would clearly show the battery, the switch, the fuse, the connection to the tow vehicle’s charging system, and the connections to the trailer’s electrical system.
Wiring and Components Based on Trailer Electrical System
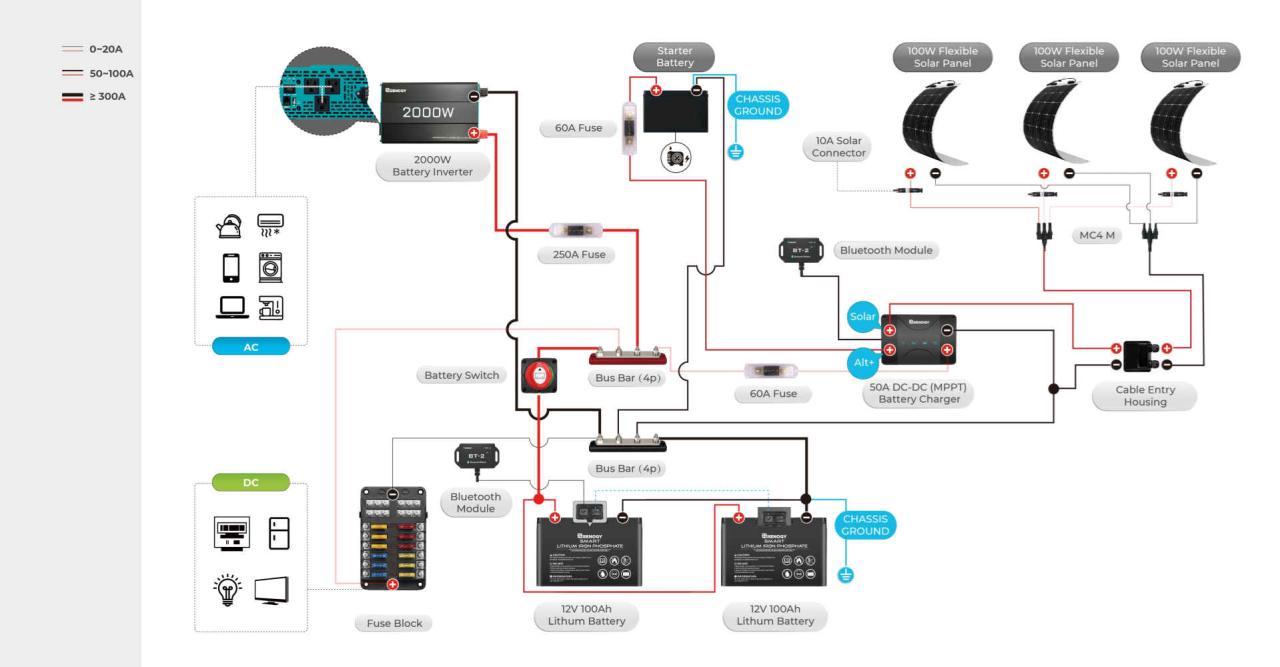
The complexity of the wiring and components directly correlates with the size and features of the travel trailer’s electrical system. A small camper with basic lighting and a small refrigerator might have a straightforward wiring system using relatively thin gauge wire. Larger RVs, however, require a more extensive wiring network with thicker gauge wires to handle the higher amperage demands of numerous appliances and potentially a larger battery bank.
These systems might also include additional components like circuit breakers, inverters, and charge controllers, all of which must be integrated correctly into the overall system. The wiring diagram would be significantly more complex, incorporating additional components and branching pathways to various parts of the RV’s electrical system.
Mastering your travel trailer’s battery switch is essential for a smooth and safe RVing experience. By understanding its function, troubleshooting common problems, and prioritizing safety, you’ll ensure your power system remains reliable and efficient. Remember, proper maintenance and safe practices are key to extending the life of your battery and avoiding costly repairs. Happy travels!
Expert Answers
What happens if my battery switch is left in the “off” position?
Leaving the switch off completely disconnects your house batteries from the trailer’s electrical system. This prevents battery drain, but also means you’ll have no power to your lights, appliances, or other systems.
Can I use a battery switch with different battery types (e.g., lead-acid and lithium)?
Generally, you can use a standard battery switch with various battery types. However, lithium batteries often require specific charging profiles, so check your switch and battery compatibility before connecting.
How often should I check my battery switch connections?
Regularly inspect your battery switch connections for corrosion, loose wires, or damage, ideally before each trip. Tighten any loose connections and address corrosion as needed.
What size battery switch do I need for my travel trailer?
The appropriate size depends on your trailer’s amperage draw. Check your trailer’s electrical system specifications to determine the correct size switch. It’s better to choose a slightly higher amperage rating than needed.
